Chart F4 Supervisory Visits
Entering new documentation and reviewing prior documentation all occurs from the Chart F4 tab. You are able to view prior notes, scheduled appointments, and the documentation from other disciplines/therapists assigned to the patient plan of care.
Insight EMR Quick Links
Supervisory Visits
Supervisory Visits include Initial Evaluations, Progress Reports, Re-Certifications of the POC and Discharge Summaries. The steps apply to both "face to face" visits and also "paper reports". In addition to the required components described under Charting Basics, the following additional steps are required:
-
Establish / Update Patient Goals
-
Add POC Date & Progress Report Due Dates to System for tracking
-
Add Diagnosis to Case
-
Add Onset Date/Signature Date/Admit Date
INITIAL EVALUATIONS
Charting the Initial Evaluation is the most complex task as it requires additional data entry for Diagnosis and Plan of Care to create the framework for the patient's therapy plan. The following are the steps:
-
Schedule and arrive the patient for an Initial Evaluation Visit Type. (go here for the steps)
-
Add Template for Initial Evaluation for your discipline (go here for the steps)
-
Complete documentation and create goals.
-
Enter details in Client Editor including Onset Date, Signature Date, Diagnosis and Plan of Care.
-
Audit and sign off.
Setting Goals
When charting a patient visit, Insight allows you to mark any line item as a goal for tracking. Most items include a default goal value (such as Independent in HEP) but you can adjust the end status/desired goal outcome manually within the chart. There are two options to select an Item as a Goal: (1) from within the chart documentation area and (2) from within the Topic Panel. set an item as a goal, right click on the Black/Bold Label and Select "Make this a goal"
Option 1: From The Charting Area

Any item selected to become a Goal is added to the Goal Tracking Sheet located at the bottom of every chart visit. Items selected to be goals for a patient also "carry forward" to each subsequent visit so that they can be updated at any time.
Option 2: From The Topic Panel
Within the Topic Panel, you can select the "Star" next to any item to make that item a goal.

Setting Goal Outcomes
It is recommended best practice to create goals as you enter in the content. Each item selected to be a goal builds a Goal WorkSheet that is the last section of every chart note which is then updated at each subsequent Supervisory Visit and Discharge. Goal outcomes are aded directly to the Goal WorkSheet.
Item
Initial
Current
Goal
By Date
Progress
Achieved On
This is the item selected for goal tracking.
Initial findings - the column is static and content cannot be modified.
Current data is dynamic and updates automatically when the Item is updated within the chart.
Goal is desired outcome. You can enter text by either selecting default choice, right clicking to see options or by free text.
If goal date is different than POC (such as for a short term goal), you can enter in the date in this column. You can also click the header "By Date" to enter a single date for all goals.
Progress lets you define "as expected" "more than expected" "less than expected" .
Date goal was achieved.

ADD POC DETAILS/CLIENT EDITOR
At the time of the Initial Evaluation (and at each supervisory visit or discharge visit) case details need to be entered within the Client Editor. The easiest way to access the Client Editor is from within the Chart Note. To do this, click on the "Case Box" which on hover shows case details and, on click, takes you into the Client Editor.

Case Box: The Red or Blue Box above the Topic Panel is the Case Box. Hover provides you with case details and a "click" on the box takes you to the Patient's
Within the Client Editor (Case Information F4 Tab) Enter the Following:
Date of Onset = Date the condition started or declined
Signature Date = Date Intake was completed (enter if you completed intake paperwork with patient.
Admit Date = Date of Initial Evaluation
Diagnosis - Click on the + sign to add diagnosis to case and search by ICD-10 Code or by descriptor.
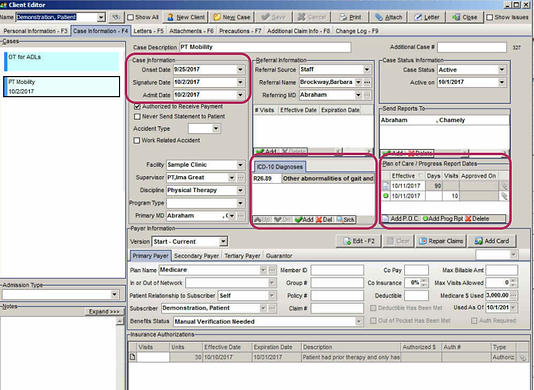
Click "ADD POC" at the time of an Initial Evaluation. System will default to insurance allowable cert period and # of visits until Progress Report is due (you can change manually).
Click the "Save" Button at the top right to save your changes and return to the Chart Note.
ADDING PRECAUTIONS
Precautions are patient-specific (not case specific) and are added within the Client Editor. Precautions appear as a pop up at every visit.

To Add Precautions:
-
Within the Client Editor, Click on the Precautions F6 Tab
-
Click the Add Button Below
-
Choose Precaution Category from List
-
Add Note
-
Click Save at top of screen.
To Delete Precaution(s)
If a precaution is no longer valid (such as a change in weight bearing status), return to this Screen, select the precaution, and click Delete at the bottom.
PROGRESS REPORT
The steps for a Progress Report are the same as for any other visit but also require the therapist to Update Patient Goals and Add Progress Report to Patient Details section to reset visit count.
-
Schedule/Arrive the Patient
-
Load Chart Template for a Progress Report (with or without re-certification)
-
Update Patient Goals
-
Add Progress Report to Patient Details/Client Editor Section to re-set visit count.
DISCHARGE
Discharge Steps
-
Schedule/Arrive the Patient
-
Load Chart Template for a Discharge Report
-
Update Patient Goals
-
Change Patient Status from Active to Discharged within the Client Editor / Case Information Tab.
-
Enter Discharge Date & Reason.

PAPER REPORTS
Non-visit / Paper Reports provide documentation for a patient even when the patient is not seen. For example, a patient who was discharged to HH may need a "paper" report only. The steps are identical to creating any other report, but please make sure your Procedure Time/Minutes is set to "0" so that a bill is not generated.