THE SCHEDULE F3 TAB
Appointments are scheduled on the Schedule F3 tab. What is important to know is that a patient must have a scheduled appointment in order to completing charting and documentation for visit.
Also, the Visit Type on the Schedule is used in part to help generate your pay and to create documentation for POC Certifications. Therefore, choosing the correct visit type is also critical.
With Pariox, scheduling must be entered twice: once in Pariox and a second time in Clinicient.
Schedule Screen Overview

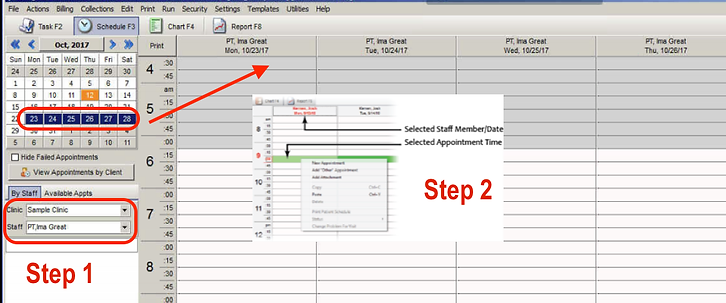
Selected Date
Click any date to change
Clinic & Staff Name will be the same
Double click on line at time you want to schedule
Staff Name & Date
HOW TO SCHEDULE AN APPOINTMENT
Step by Step
Ensure that you are on the correct date of service (mistakes with this happen often!). Then on the time that you wish to schedule the patient appointment, "right click" on the line and choose "New Appointment"
.png)
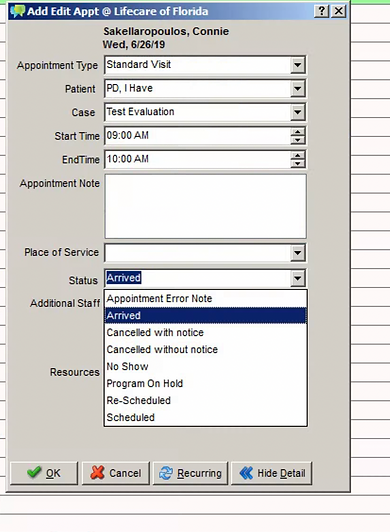
You will then provide the Appointment Details:
Appointment Type
Patient
Case
Start/End Time
Appointment Note
Status
Additional Staff
Resources
Define the type of visit (i.e., Initial Evaluation, Standard Visit, Progress Report, etc

[you can filter by starting to enter patient last name]
Cases organize the EMR System. Cases are named starting with the discipline and then the date of referral. For example, a patient referred for Physical Therapy in March 2019 will have a Case Name "PT 032019".
System provides default times but you can adjust as needed.
Notes are used to document missed visits/cancellations but not normally needed for routine scheduling.
The default setting is "Scheduled" which lets Lifecare know that you have a scheduled appointment with the patient.
Optional and usually not needed.
Optional and references if you need a particular treatment room or equipment for the patient.
Click OK

MAKING A RECURRING APPOINTMENT
You can choose to make recurring appointments for a patient. To do this, click the Recurring Button on the appointment:

You can choose to recur on specified days or total number of visits and also define the "End By" date. Make sure to check the "Don't Double Book" option!

VIEWING YOUR APPOINTMENTS
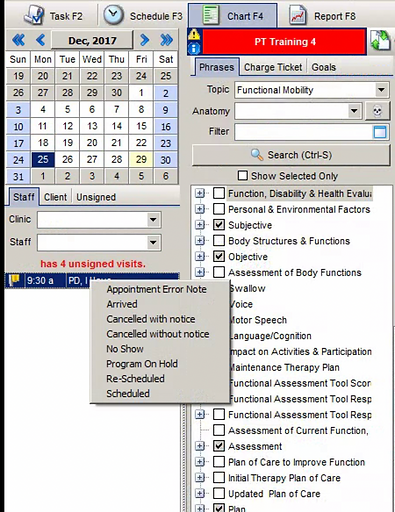
While you can view from the Schedule F3 tab, your appointments for a day also appear on the Chart F4 tab so you can begin documentation.

ARRIVING A PATIENT FOR A VISIT
A patient's Appointment Status must be changed from "Scheduled" to "Arrived" in order to enter chart and begin documentation. This can be done from either the Schedule F3 Tab or the Chart F4 Tab
From the Schedule F3 Tab
Right-click on the appointment and choose "Edit Appointment". Change Status Field from "Scheduled to Arrived".
From the Chart F4 Tab (recommended)
Appoints for the day appear. under the Calendar on the Chart F4 Tab. You can "right click" to change the appointment status to "Arrived".
DOCUMENTING A MISSED VISIT
Consistent with LifeCare Policy, the reason for a missed visit must be documented. This is done on the Schedule F3 Tab.
From the Schedule F3 Tab
Right-click on the appointment and choose "Edit Appointment". Change Status Field from "Scheduled to the appropriate cancellation choice (No Show/With Notice/Without Notice) and document reason in the Appointment Note Field.
